Windows 8.1 comes with two different versions of Internet Explorer:
- IE11 which is the new ‘metro’ style app and is opened by clicking a tile on the Start screen
- IE11 for Windows 7, which is a more traditional version and is opened by clicking an icon on the Desktop
You’ll need:
- A computer with Windows 8 running.
- An internet connection.
Follow these step-by-step instructions to become familiar with the new ‘metro’ version of IE11
Step 1: To open Internet Explorer, click the tile on your Start screen.
Step 2: If, when you have finished browsing, you press the Windows key to return to the Start screen, next time you open Internet Explorer you will see the last webpage that you viewed.
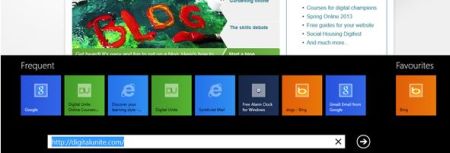
Step 3: To go to another website, click your mouse in
the Address Bar at the bottom of the screen, or tap it with your finger
if you are using a touchscreen. Now type the website address or a
subject you wish to search for.
Step 4: As soon as you start typing, the search engine
will try to guess what you want to find and will display tiles for
possible sites that you have previously visited or added to your
Favourites (see how to add to your Favourites list below ).
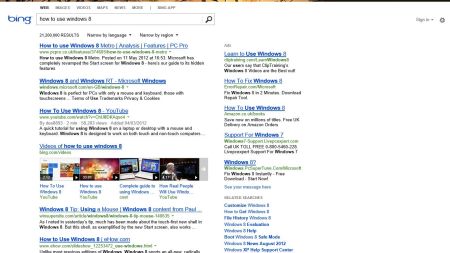
Step 5: If you don’t want to use any of these tiles, press the Enter key
when you have finished typing and you will see some search results from
Bing which is the Microsoft search engine and very similar to using
Google. You can now choose a site by clicking on one of the blue links.
(For help with searching the internet, have a look at our guides to searching and browsing.)
Step 6: Web pages always open full screen. To move
backwards or forwards through pages you have visited, move your cursor
over to the left or right hand side of the screen to reveal a left or
right arrow to click on. The Backspace key will also take you back to the previous page.
Step 7: When you click on a link, you will see the
Address bar appear at the bottom of the screen. Alongside it are some
additional icons:
- The arrows at either end take you backwards (right) or forwards to pages you’ve already visited.

- The Refresh icon (right) re-loads the screen – click this if the page doesn’t display properly.

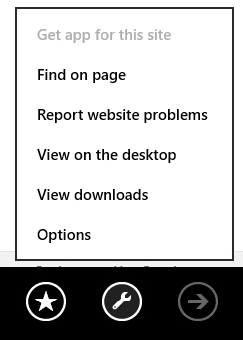
- The Tools icon (spanner) gives you several options:
- 'Get app for this site' will take you to the Store, if the site you are on has its own app. If this option is ‘greyed out’ as in the screenshot, it means there isn’t an app available.
- 'Find on page' enables you to search the current page for a word or phrase.
- 'Report website problems' will send information to Microsoft.
- View on the desktop will open the current page in the more traditional version of Internet Explorer on the Desktop.
- 'View downloads' will open your Downloads folder and show any files you have previously downloaded.
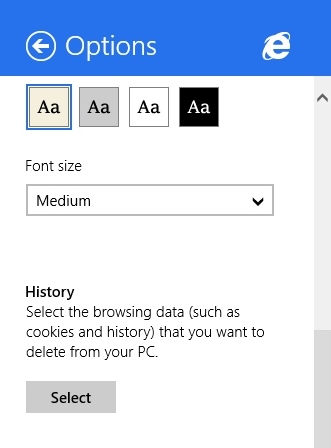
- 'Options' gives you customisation options e.g. a Zoom for making webpages larger or smaller
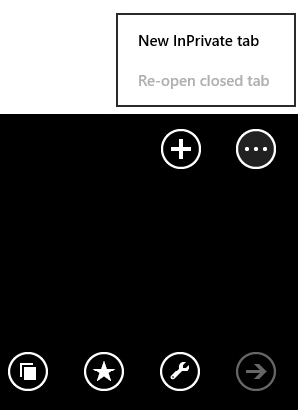
- Click the Tab icon to see other tabs that are open. Click the + to open a new tab. Clicking the other icon with the three dots in it gives you the options to close the tabs or open a new InPrivate tab. Browsing in an InPrivate tab means that the websites you visit won’t be added to your Internet History, so this is a safer option if you are using a shared computer.
- The Drawing pin icon enables you to pin the site to the Start screen, which means that it will have its own tile.
- Click the Star icon to add the current website to your Favourites
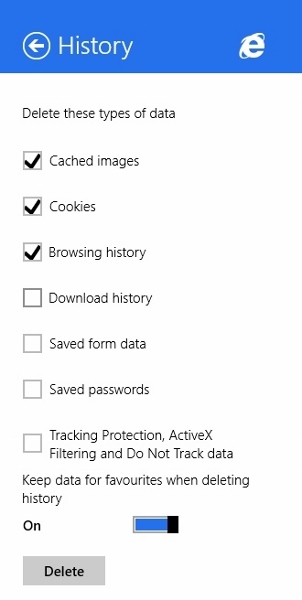
Step 8: To delete your browsing History:
- Open Internet Explorer.
- Open the Charms Bar by pointing your mouse at the top or bottom right hand corner of the screen.
- Click the Settings Charm.
- Click Options.
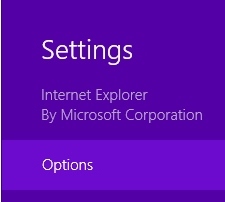
- Scroll down to 'History' and click Select.
- Press the Escape key or click elsewhere on the screen to close the Internet Explorer Settings pane.
- Check the boxes against Browsing history and any additional data you wish to delete. Click Delete.
Step 9: As mentioned previously, when you have finished browsing all you need do is press the Windows
key to return to the Start screen. Next time you open Internet
Explorer, it will return to the last site you visited. However, it is
possible to set up a Home page as in previous versions:
- Go to the site you would like for your Home page e.g. www.google.co.uk or any other site of your choice.
- Open the Charms Bar and click Settings.
- Click Options.
- Under Home pages, click Customise.
- Click Add current site.
Now, when you finish browsing in the new ‘metro’ style Internet Explorer, close the window by clicking your mouse on the X at the top of the screen. Next time you open it you should see your chosen Home page.
If you don’t like the new Metro style, it is also possible to set
Internet Explorer to always open on the Desktop, even when you click the
tile on the Start Screen:
- Open Internet Explorer on the Desktop.
- Click Tools (the ‘cog’ icon top right).
- Choose Internet Options from the menu.
- Click the Programs tab.
- Check the box next to Open Internet Explorer tiles on the desktop.
- Click Apply and OK.
Tidak ada komentar:
Posting Komentar