Senin, 22 Mei 2017

What we do

Digital Unite has been providing digital skills support for 21 years. Our customers choose us because they want a cost-effective, proven approach for building digital skills capacity.
We specialise in turning staff, residents and volunteers into effective Digital Champions – people who can stimulate the take up of online services and promote the confident and continued use of the internet.
The Digital Champions Network is our unique and comprehensive training and support system for Digital Champions. It’s trained thousands of Digital Champions across the UK from more than 30 member organisations including 4 local authorities and 17 housing providers.
Learn what’s inside the Digital Champions Network or see how we work with specific industry sectors.


What is Windows?

Windows is a collection of programs known as an operating system (OS) that controls a PC (personal computer). First produced by Microsoft in November 1985, it has been frequently updated since, as computer memory has got bigger, as processing chips have got faster and, of course, when the internet was invented. Prior to Windows, PCs were operated by a series of text commands.
Windows' key benefits and features

  • Allows the user to interact with the computer (through the keyboard, mouse, microphone, etc.).
  • Controls the storage of data (images, files, music).
  • Controls hardware attached to the computer such as webcams, scanners and printers.
  • Helps to open and close programs (word processors, games, photo editors, etc.), and gives them part of the computer’s memory to allow them to work.
  • Controls what access to a computer different users have and the computer's security.
  • Deals with errors and user instructions, and issues simple error messages.
  • Promotes multitasking by allowing the user to do several things on the computer at once – for example, watch a video while writing a letter.
Other operating systems are available, notably the Apple OS X used in Mac computers. In addition, with the increased use of smartphones, notepads and tablets, there are systems aimed directly at mobile devices. However, most people who learn to use computers do so on a system running Windows.

Five top tips for Mac users

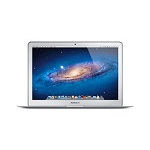
Mac computerIf you’re used to using PCs and have recently changed to an Apple Mac computer, there are some subtle differences that you will need to get used to. Once you have got used to these, however, you will probably wonder how you ever coped with the old way of doing it!

 
  1. The keyboard is very different  It may not seem obvious at first glance, but Mac keyboards are different to Windows keyboards, in quite significant ways. For starters, there is only one mouse button, so right-clicking and left-clicking goes out the window. Apple has put together a comprehensive guide (link opens in new window) to the similarities and differences between the two types of keyboard. 
  2. Get protected  Apple machines were historically seen as immune to viruses and malware. Even now, Apple users will often advise each other not to bother running anti-virus software. This is not necessarily sensible advice.
    While the smaller number of Macs to PCs means hackers generally focus their energy on the larger target group (PCs) this does not mean Apple machines are without security flaws. Nothing is perfect, even something as pretty as a MacBook Air. Apple’s browser, Safari, for example, has had several famous flaws highlighted in recent years.
    Sophos offers free tools for Mac home users (link to Sophos for Macs). 
  3. Shortcuts  Shortcuts are your friend on a Mac. And by shortcuts, we mean certain combinations of keys to quickly perform a task. Here are just a few of the basics
    ⌘ + Q = Quit
    ⌘ + W = Close window
    ⌘ + O = Open a file
    ⌘ + P = Print
    ⌘ + C = Copy
    ⌘ + V = Paste
    ⌘ + X = Cut
    ⌘ + S = Save
    ⌘ + Z = Undo
    ⌘ + A = Select All
    Fn + backspace = Delete
    For a fantastic and comprehensive list of shortcuts, www.mactipsandtricks.com has a handy guide.
     
  4. Desktop shortcuts can be very handy
     
    If you’re used to using your computer’s desktop as a dashboard to access files, you may wish to ease yourself into the Mac experience by creating a ‘Documents’ shortcut on the desktop, ditto a shortcut to Mail and Safari. This may clash with Steve Jobs’ vision of a clean, uncluttered desktop, but your layout has to work for you! After a while, you’re likely to be so comfortable with the Mac way of working, that you can ditch these shortcuts.
     
  5. Scrolling, scrolling, scrolling...
     
    The 'Trackpad' on a Mac scrolls ‘naturally’, which is the opposite to the Windows ‘downward scroll’ that you’re used to. This can be unsettling, but it’s easy to change if it makes you more comfortable. Go to Apple key > System preferences > Trackpad System Preference and uncheck ‘natural scroll direction’.

How to complete online forms

Online forms are completed by typing requested information into boxes (also known as ‘fields’) or choosing information from lists which can be presented in various ways. There may also be a range of options from which you can choose by clicking small boxes (called check boxes) or circles (called radio buttons). If you want to enter online competitions, or place online orders, you are likely to come across a lot of these forms!

 
Key features of online forms
 
  • Fields: These are boxes into which you type information.
 
 
  • Drop down lists: These fields have an arrow in them, when you click it you will see a list to choose from. Click an item in the list to choose it.
  • Check boxes: These are small boxes which you need to click in order to tick or untick as required. Watch out for these at the bottom of forms with the ‘small print’. You may also need to tick a box to confirm that you’ve read the terms and conditions of the website and there should be a link to click on e.g. here is a link to the terms and conditions for the DU website http://digitalunite.com/terms-conditions.  Always make sure you read them so that you know what you are signing up for. 
  • Radio buttons: These are small circles which you click to select. The one you’ve clicked will have a dot in it. 
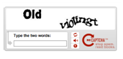
  • CAPTCHA: This is a box with some random letters or numbers in it which you have to copy into the box below. This confirms that you are a human being and not an automated program. To find out more, see our guide What is CAPTCHA?. If you can’t read the characters, click the refresh icon  for a different challenge. 
  • Submit button: This button needs to be clicked on to send the completed form. It may say ‘Submit’ or something similar, depending on the purpose of the form. Make sure you click this just once. If you ‘double click’ you may send the form twice.
  • If there is a problem with the form, for example you’ve forgotten to complete an essential field, it won’t be submitted but you will receive an automated message telling you something is wrong and the problem area of the form is usually highlighted in red. You will need to complete that field and submit the form again.
 
Important things to remember
 
  • Never complete personal or bank information unless you have checked that you are on a secure website. The website address should start with https (the ‘s’ stands for secure) and you should see a padlock icon. 
  • The insertion point (or cursor) must be in a field before you can type into it. If it isn’t there, place your mouse pointer in the field and do a left click.
  • The quickest way to move the insertion point to the next field is to press the Tab key on your keyboard, but you can also click into it with your mouse.
  • Don’t press the Enter key until you’ve finished completing the form. If you press it earlier, it may think you’ve finished which means that you will probably have to start again from the beginning.
  • Make sure you only enter the information that is requested. If a question doesn’t apply to you, leave it blank.
  • An asterisk * means the information is essential.  
  • Password, dates, telephone numbers and postcodes usually need to be typed in a certain format e.g. with or without a space. There may be an explanation of what’s required written next to or below the field.
  • Sometimes, clicking an i or ? next to a field will give you information about how to complete it.
  • Clicking an icon like this next to a date field will open a calendar – click on a date to choose it.

How to turn on a computer

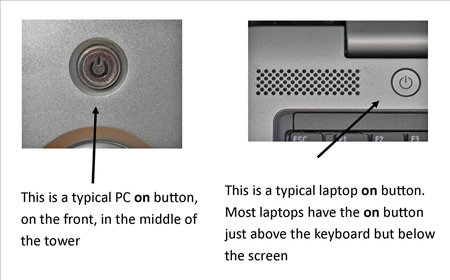
Turning on your computer isn’t always easy. Some manufacturers hide the ‘on’ button – for instance, on top of the case or flat on the front where you can’t see it. When you get your computer, don’t be embarrassed to ask: ‘Where’s the “on” button?’

Follow these step-by-step instructions to help you turn on your computer
 
Step 1: Find the ‘on’ button. It probably looks like this (but might be square or oblong!):
 
PC and Laptop on button
 
Step 2: Push the button.
 
On some computers, the button lights up when the computer is on. On laptops, there’s often a light on the front that comes on. You may have to keep pushing for a couple of seconds to make this happen, but don’t worry – you’ll soon get to know how your computer works.
 
If nothing happens, there are a few things you can check easily:
 
  • If you’re using a laptop, the battery might be flat. So plug in the charger, plug the charger into the mains and let the laptop recharge. You can continue to use it while it’s doing this.
  • If you have a PC, make sure that the plug or any of the other wires haven’t become disconnected.
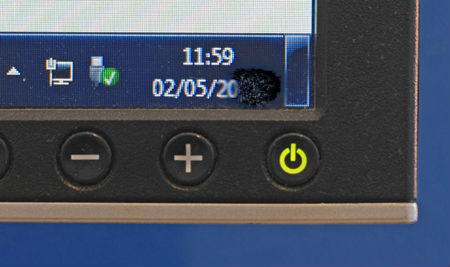
  • Ensure that the monitor is turned on. Most PC monitors have an ‘on/off’ button on the bottom corner of the screen (see below). The button often lights up green when the monitor is on.
Monitor on/off button
 
Step 3: Now you need to log in.
 
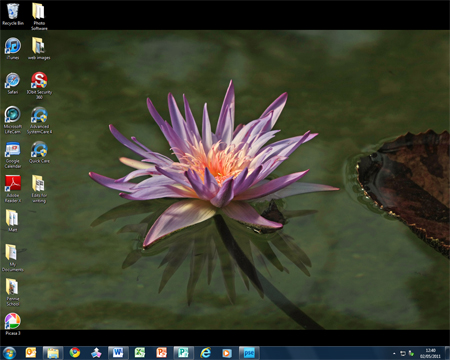
If you’re the only user of your computer, once it’s turned on it may go straight to the desktop:
 
Desktop
 
If you’re using a public computer – for example, in a library – you’ll be given instructions (and help if you ask for it) on how to log in.
 
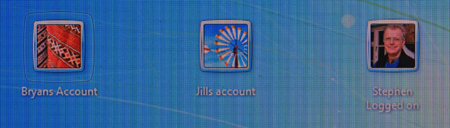
If you’re sharing your computer with other people, each one will usually have their own account. When you turn on the computer, the screen will look something like this:
 
Log on accounts
 
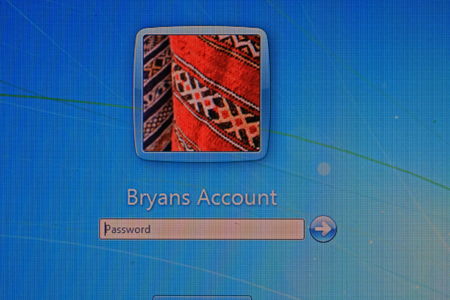
When you click the icon above your name, you’ll be asked for a password. The main user or administrator should set this up for you before you begin. Type in your password and click the arrow.
 
Computer account
 
Done!
 
Top tip: surge protectors
 
If you have a PC, it’s a good idea to buy a ‘surge protector’. This prevents your computer being damaged if there’s a sudden problem with your electricity supply. You can buy surge protectors that let you plug all your separate pieces of equipment into them, in addition to your computer. Then when you turn your computer on or off, this automatically turns them on or off, too.

Why is my computer so slow?

When you first get a computer, it may seem very quick and able to handle a number of tasks with ease. However, over time you may find that it starts to get slower to respond and particularly if you have a few applications open at the same time.

This guide will give you step by step suggestions for some of the things you can do to free up space and help your computer run faster.
 
You’ll need:
 
  • A computer with Windows 7 installed.
Follow these step-by-step instructions to help your computer run faster
 
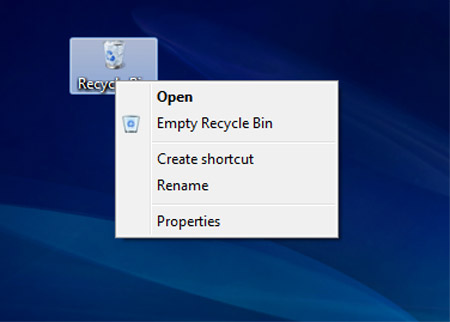
Step 1: Empty your recycle bin. When you delete documents etc, they are sent to the recycle bin, so deleting all data in the recycle bin can free up space. Find the recycle bin icon on your desktop. 
 
 
Step 2: double click on the icon and check all the documents and data in the bin to check you are happy to delete everything. Close the bin.
 
Step 3: Right click with your mouse on the recycle bin icon. Choose Empty Recycle Bin from the menu by left clicking with your mouse.
 
 
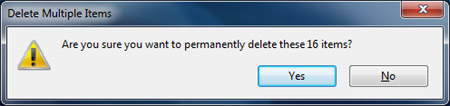
Step 4: You will be asked if you are sure you want to delete the items. Click on Yes. Your recycle bin will be emptied.


Step 5: Uninstall any applications or programs that are not used, as these can take up a lot of hard drive memory and this can cause your computer to run slowly.
 
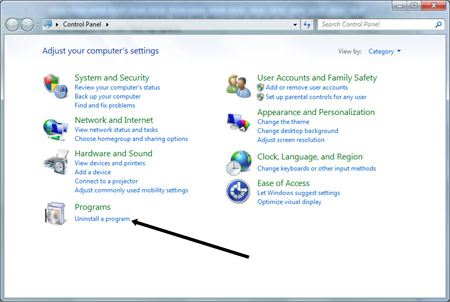
Step 6: From the start menu, choose Control Panel. Once the Control Panel is open, choose Uninstall a program.


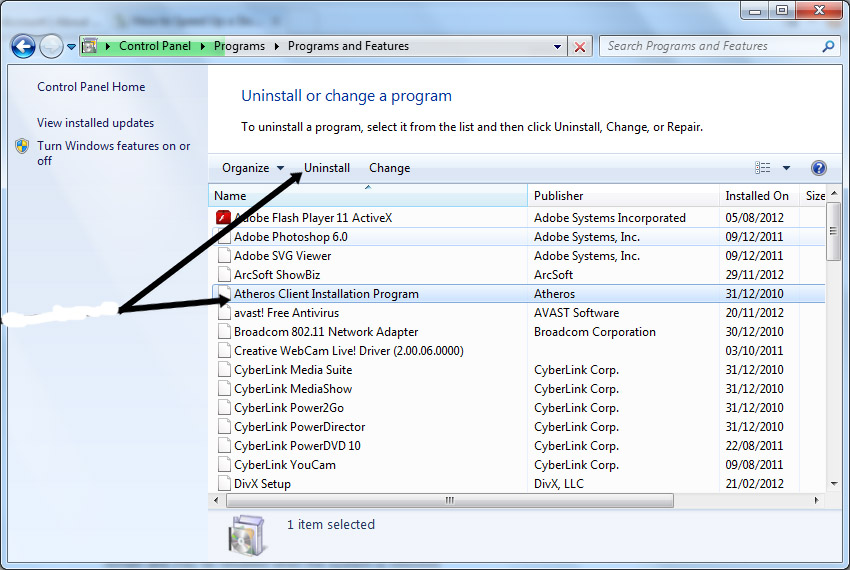
Step 7: Scroll down the list of programs and find any that you do not use. Click on the program in the list so that it is highlighted, then click on Uninstall. Follow the on screen instructions to remove the program.


Step 8: Run a 'Disk Cleanup'. A number of files and applications can use up memory and aren’t required – such as temporary files and cookies. Running Disk cleanup will allow you to remove any data that isn’t needed to free up more space on your hard disk.
 
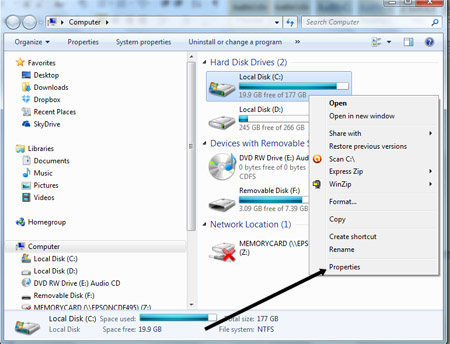
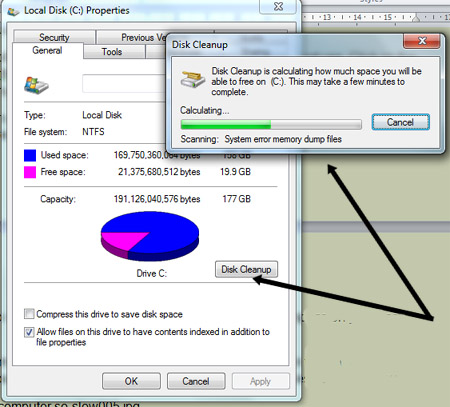
Step 9: From the Windows Start Menu, choose Computer. When the computer dialogue box opens up, right click on the C: and choose Properties from the menu.
 
 
Step 10: Click on Disk Cleanup in the next window, the computer will then go through a number of files and programs to see what can be deleted. 


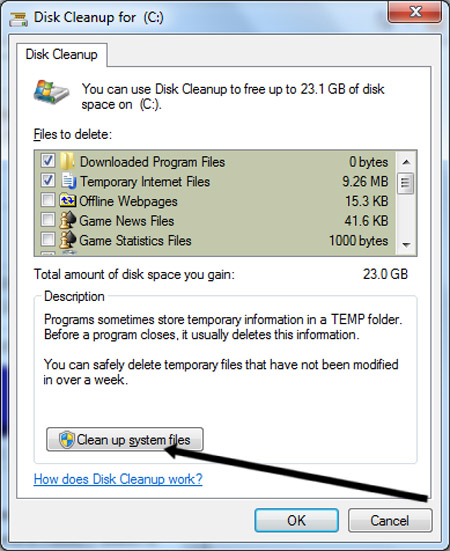
Step 11: Once it has done this, it will offer a list of possible files to delete.
 
Step 12: Scroll down the list in the disk cleanup to see what you can delete to free up space. Click in the tick box to choose the item. When you have finished and are happy to delete the files, click on Clean up system files. 


How to use a mouse

Your computer mouse lets you move the cursor (pointer) round the screen and then ‘click’ to start a program or begin writing in a particular place or open a menu to see what choices you have. All desktop computers come with a mouse, and you can use one on a laptop if you don’t like the touchpad that’s built into it.

Invented in 1963 by Douglas Engelbart, the computer mouse has developed over the years and now comes in a variety of designs. It’s called ‘mouse’ because it has a basic mouse shape and the cable that attaches it to the computer looks like a tail. When referring to the device in the plural, both ‘mice’ and ‘mouses’ are acceptable, according to the Oxford English Dictionary.
 
Mice were first made with two gear wheels to define direction and then with a ‘trackball’, all of which moved in contact with a surface. Today optical mice that use light to detect direction are more common. Mice can also be cordless, making them easier to move.
 
Follow these step-by-step instructions to help you get to know your mouse
 
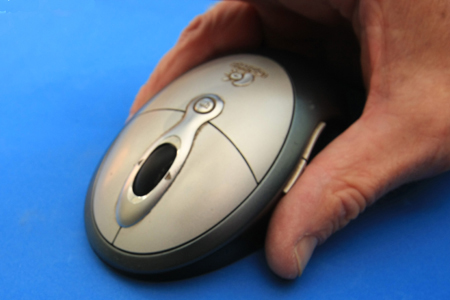
Step 1: Pick up your mouse and have a look at it.
 
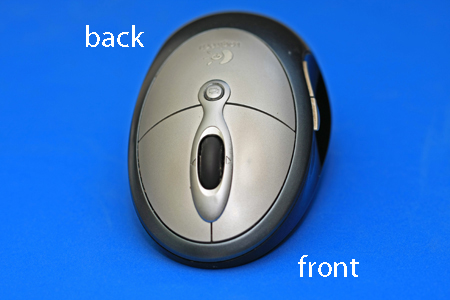
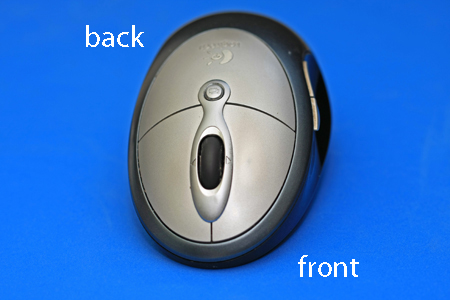
Computer mouse
 
At the front (which points away from you), there are two buttons – left and right. You press or, more correctly, ‘click’ these to make things happen.
 
Most mice also have a wheel in between the buttons that you roll to move up and down the screen – technically called ‘scrolling’.
 
Computer mouse scrolling
 
Step 2: Learn to hold your mouse comfortably. It’s normally held between your thumb and little finger like this:
 
Holding the mouse
 
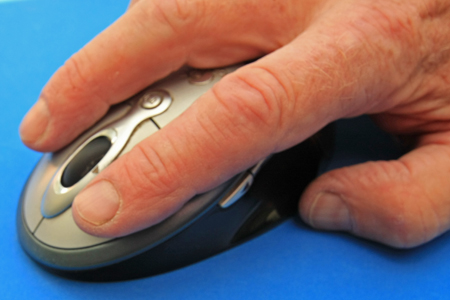
Step 3: Have a click. Use your index finger to click the left button and your middle finger to click the right button:
 
Computer mouse buttons
 
If you’re left-handed, you can use the opposite fingers. However, you can also usually change the preferences on your computer to swap which buttons do what.
 
Step 4:  Try a double-click. This is done quite often on the left button. You have to click twice, as quickly as possible. The first click tells the computer that you are in a particular ‘window’, and the second click tells it that you’re selecting a button or link or whatever to do something in that window. If you click too slowly, the computer just thinks you’re telling it where you are again and again, so do click quickly.
 
Step 5: It’s time to practise. You’ll find some simple mouse exercises on the SeniorNet.org website. To reach them from here, place the cursor over the highlighted ‘simple mouse exercises’ above – this is known as a ‘link’ – and click the left button. Did you notice how the cursor turned into a little hand when it was over the link? That tells you that you can click on that word or phrase to go somewhere else on that website or on the internet as a whole.
 
Step 6: Now try a right-click. Just click the right button, paying no attention where the cursor is on the screen. A menu will appear, giving you options. Whenever you right-click, it opens a menu. If you move your cursor off the menu and left-click, the menu will close.
 
In other Digital Unite guides, you’ll often be told to ‘click’ and sometimes to ‘double-click’ or even ‘triple-click’. When it says this, it always means that you should use the left button. If you need to ‘right-click’, you’ll always be told to ‘right-click’!